Tactile Immersion - General Discussion - Hardware & Software

i find anything much above 100Hz distracting
I run my exciters higher, simulating tire squeal,
which works because the telemetry being used is slip.
Tuning it to blend with squeal from AC game audio was not hard.

I was thinking about getting a G-Belt or PT Actuators unit
Barry at Sim Racing Garage just reviewed PT Actuators' tensioner,
confirming for me that DIY hobby servo actuation suffices...
 
Last edited:
Personally I think the PT Actuator version looks very primitive next to the G-Belt especially in terms of software. However the G-Belt appears to have serious availability issues right now so I guess it doesn't matter anymore.

The PT mount at the frame is wrong. All the people who tried the G-belt at the frame and mounted it up top liked it much better up top.

Just saying that you shouldn't write both products off together.
 
Last edited:
I've only started watching the review but immediately I am happy that this was not available when I decided to try the G-Belt out. Very happy I went the way that I did. I might have been tempted to try this one especially because I was never a huge fan of SimCommander from years ago using it with Simvibe.
 
Personally I think the PT Actuator version looks very primitive next to the G-Belt especially in terms of software. However the G-Belt appears to have serious availability issues right now so I guess it doesn't matter anymore.

The PT mount at the frame is wrong. All the people who tried the G-belt at the frame and mounted it up top liked it much better up top.

Just saying that you shouldn't write both products off together.
I’m sure they liked it on the back of the seat because of lack of rollers through the belt holes. My PT with rollers feels very detailed!

I really like the PT unit, both brake and sway. Not heave tho, feels wrong to be pulled backwards for heave.

Agree on somewhat limited sw, as i’ve liked the gearchange to be a tad stronger in it.

The gear change with the G-Belt especially while downshifting and braking is a very good and as powerful as you want that effect at least to me. It gives you a sense of how you can unsettle the car while braking.

I'm sure that for heave to feel more correct, you would want the lower belts pulling down.
Yes, i’m asking SRS for a possibility to implement adjustment for it.

Definently would be better together with lower belts!
Tried setting lower belts to the floor and let motion do it, but the motion also does alot of other stuff, making the belts feel like tensioning randomly sometimes.
 
I have been using srs for a little while but I am looking to move to something else because of its seatbelt support. Before the PT belt was released they had support for a belt and the options were quite simple, basically 'how much force' and I assume that it is linked to surge.

Then they released more options but only for the pt belt and those were not made available to people using another belt. So I dont see them expanding options for people not using their own hardware any time soon.

Features that I quite like that other software has is the ability to have a curve - not just a linear 'factor' or whatever they call it. This is important because if you want some feedback through trail braking, and other effects but you may not want super strong pull on heavy braking you cant get it.. you have to increase at both ends in SRS. On flypt it was nicer for the belt out of the box and you could also o cool stuff like adjust the tension of the belt on the fly with a rotary knob.. I didnt put in a lot of time with flypt because of the learning curve and SRS was doing ok with very little work but now I am feeling some limitiations perhaps.
 
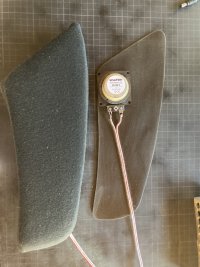
Well, I tried something. I made a plastic insert to go into the padding on the edges of my seat. I attached an exciter to the plastic and then fit them into the covering with the foam behind the plastic. These are the side pieces of the seat that attach with Velcro, and when you sit in the seat, support the sides of your torso. Got one of the Nobsound amps and connected everything up.

I was concerned that the plastic would be too hard and uncomfortable against my body. However, it’s completely fine, I didn’t find any discomfort at all.

I was skeptical, but I have to admit, the result is very good. I’ve only done some basic testing with engine RPM and a few other things, but the strength of the effects is very good. The entire piece of plastic vibrates and resonates, and you feel the effects all the way from the top to the bottom of the padding.

In case anybody wants more details or has questions let me know. It started as an experiment, but I’m much happier with the result than I expected.

A few pics here, hopefully you get the idea.
 

Attachments

  • 18C26179-8C1D-4BA8-A8F7-03AF3398F6A8.jpeg
    18C26179-8C1D-4BA8-A8F7-03AF3398F6A8.jpeg
    541 KB · Views: 129
  • 55D0BC3F-10AF-499F-9535-5A21CF322038.jpeg
    55D0BC3F-10AF-499F-9535-5A21CF322038.jpeg
    512.1 KB · Views: 122
  • C2B8AC4A-7556-451A-A9F5-61EB77BB4404.jpeg
    C2B8AC4A-7556-451A-A9F5-61EB77BB4404.jpeg
    722.6 KB · Views: 123
I’m so happy with my exciter additions to the sides cushions. The more I experiment and adjust, the more interesting and fun it gets. They are so direct to the body without need for the ‘isolation’ stuff. Its relatively inexpensive too. You don’t need 1000watts.

I’m going to try to do the same thing with the padding at the back of the seat. This time with two exciters along the back. Might just be a nice and additional kick for gear changes I’m looking for (on top of the under seat lfe).
 
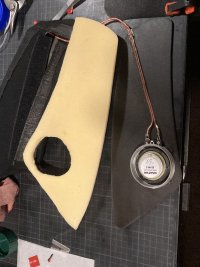
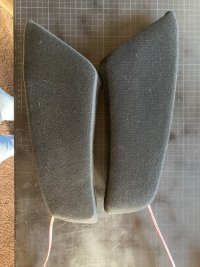
Here is the insert for the back piece. Same idea as the side pieces. I cut a big piece of plastic (Polystyrene about 1.2mm thick) and mounted the exciters to the back of it. The plastic in the side pieces is thicker and more rigid, but for this I wanted the whole thing to be able to bend/flex more, so I used something thinner. The plastic goes into the covering, then the foam padding squished behind it.

One thing that might not be clear from the prior pics and these. The exciters I'm using are 'Visaton' (locally available) but they are fully open so I found that in this situation, when you have your body weight compresses the cushion, it can interfere with the movement and even block them. I solved it by putting a make-shift plastic ring around them. Material used = old small peanut butter plastic jars. Perfect diameter. The side cushions I used the jar, cutting a section to be fit around the exciter (you can see in the pictures from my other post). For this back piece, I used the lid (the blue piece in the pics), which is just the right height, and I cut out the centre so they can still freely move and don't bottom out.

Also a picture of the seat, in case it’s not really clear what I’m doing here. Those padded inserts are standard with the seat I have, so when put back together everything looks absolutely stock.

Haven’t tried it out yet, but maybe later today. I’ll have to swap the connections over from the side wing ones though. I only have the one Nobsound amp so I’ll need to order another one.
38FDEFC0-6DDA-4DB3-ABFB-1C3E841910D3.jpeg
ACD8A235-6335-4A1A-803B-453DCB5EB894.jpeg
 
Last edited:
Here is the insert for the back piece. Same idea as the side pieces. I cut a big piece of plastic (Polystyrene about 1.2mm thick) and mounted the exciters to the back of it. The plastic in the side pieces is thicker and more rigid, but for this I wanted the whole thing to be able to bend/flex more, so I used something thinner. The plastic goes into the covering, then the foam padding squished behind it.

One thing that might not be clear from the prior pics and these. The exciters I'm using are 'Visaton' (locally available) but they are fully open so I found that in this situation, when you have your body weight compresses the cushion, it can interfere with the movement and even block them. I solved it by putting a make-shift plastic ring around them. Material used = old small peanut butter plastic jars. Perfect diameter. The side cushions I used the jar, cutting a section to be fit around the exciter (you can see in the pictures from my other post). For this back piece, I used the lid (the blue piece in the pics), which is just the right height, and I cut out the centre so they can still freely move and don't bottom out.

Also a picture of the seat, in case it’s not really clear what I’m doing here. Those padded inserts are standard with the seat I have, so when put back together everything looks absolutely stock.

Haven’t tried it out yet, but maybe later today. I’ll have to swap the connections over from the side wing ones though. I only have the one Nobsound amp so I’ll need to order another one.View attachment 547294View attachment 547295
Brilliant work, sir!

Thank you very much for the excellent writeup and images. Kudos for the intrepid approach to modding a very nice seat and for sharing your tactile observations!

You are forgiven for preferring crunchy to creamy!
 
the intrepid approach to modding a very nice seat

Yeah, I'm not afraid. Although the pics don't really show it properly, you may notice that I've 'blacked out' some of the stitching of the logos which was previously white. The 'Grid Q' and the 'Sparco' in the leg support are blacked out simply with flat black permanent fabric paint. It now looks like black thread, and is much more subtle in person. Once you have the seatbelts (they also have white Sparco logo, but you can't see in the pics since they are folded over the seat back), and the seat (with logos in white), there's just a bit too much 'Sparco' for me. I like branding, but sometimes it can get a bit much. I kept the one white 'Sparco' on the top of the seat.... that's enough.

Won't be able to test it tonight, but whenever I do, I'll give a short update back here. Another Nobsound on order, but will take approx a week to arrive before I can test all 4 pieces together. Based on the strength I saw with side-pieces, I'm think this new back piece will be a nice compliment for gear changes together with the under-seat LFE-CT.
 
Personally I think the PT Actuator version looks very primitive next to the G-Belt especially in terms of software. However the G-Belt appears to have serious availability issues right now so I guess it doesn't matter anymore.

The PT mount at the frame is wrong. All the people who tried the G-belt at the frame and mounted it up top liked it much better up top.

Just saying that you shouldn't write both products off together.
Hi.
About to pick between these two systems and would love to hear your thoughts.
 
Hi.
About to pick between these two systems and would love to hear your thoughts.
What else is there to say?

I had a quick look video about the G-Belt below. I did upgrade that crap 5 point belt to a 6 point Crow harness that I really like. That idea that you might void the warranty on the PT-Actuator system just to put a high quality seat belt on it seems like an issue to me.

 
Last edited:
Won't be able to test it tonight, but whenever I do, I'll give a short update back here

Well, I have a mixed report back after some testing.

First, the back piece does work. And it really works better (ie. stronger) than I thought it might (note, I only tested the back-piece, since I only have 1 Nobsound amp, so the side-bolster pieces were disconnected). Will have to do further testing with all 4 channels connected after I get the 2nd amp.

However, the 'peanut-butter-lid-mod' does not allow enough clearance for the exciter movements, when under heavy braking. If you had non-loadcell brakes, it'd probably be fine. But when you have a heavy brake like me (HE Ultimate), there is of course a heavy compression of your body against the seat back. In this case, there must be some of the foam or other padding interfering with the exciter movement when under that pressure, because they tend to cut out (and come back immediately when you release the heavy brake pressure).

I'll have to scrounge around for something of similar diameter, but a bit deeper to give a bit more protection and prevent them from bottoming out when braking. Not sure about other exciters, but if there are alternatives that are fully enclosed in metal or heavy plastic, that would be better.

I also understood better the capability of SimHub to have clone-effects, passed to different channels. So I have 2x Gear Shift effects. One at lower Hz sending to the under-seat LFE-CT. Then the second is sending also the gear change to the back-piece, but at higher Hz (too low Hz is not strong enough). I knew this was possible, but never really went down that path. The more I use SimHub, the more I understand how incredibly impressive it is. Another 'donation' to the creator will follow shortly.

Otherwise, those exciters in the back piece seem to do a really nice job and open up the doors to lots of experimentation. And all-in all, was pretty inexpensive with just a bit of DIY to consume a couple weekend afternoons.

Pretty happy with myself (and the result), actually.

(Oh, and last point. I'm still using my mother board outputs for all channels (so now is 6 total). Asus Tuf Z690. There was some reviews commenting about a low-quality audio chip, and significant cross-talk (which i was concerned about). Perhaps I'm missing something, but as far as I can tell, I have zero issues here with cross-talk for this application. I'm testing just in SimHub to 'test' the channel outputs in the sound config screen. The final test will be when I get the 2nd Nobsound amp, but so far, no issues that I can determine).
 
Last edited:
I'll have to scrounge around for something of similar diameter, but a bit deeper to give a bit more protection and prevent them from bottoming out when braking
While searching in the archives for something suitable, it dawned on me that there are still the plastic peanut butter jars. Simple cut off a bit of them and keep the same top. Should work. Let’s see.

Inquiring minds want to know, it was creamy, not crunchy.

F8CB5CC8-20F2-4749-9C24-A9EA88213F97.jpeg
22C150E9-8049-4427-B3FE-696776BC5011.jpeg
 
This may seem like a silly question. However, any suggestions on good power strips (surge protectors) to use to connect your setups? I have a CSL DD, Samsung G9, 2 Inuke 1000d's, and Philips Hue lights that would need to be connected to it. At first I was worried about the power draw, but looking at the post a few pages back seems like a power strip would be fine. Maybe still go with one rate for "appliance use"? I live in the US if that's relevant to the suggestions.
 
Most powerstrips over here are rated for 2kw so while voltage is different I imagine that the rating is still possibly similar, just more amps.

I think you could go for just about anything you want, worst case you have to reset its overload switch but with those things connected you wont lose data, its not the computer so not really a problem.

the only issue you could have is if you turn everything on at once at the switch then its all going to draw power and a number of amps might give it a problem. Past power on you should be good.
 
While searching in the archives for something suitable, it dawned on me that there are still the plastic peanut butter jars. Simple cut off a bit of them and keep the same top. Should work. Let’s see.

Progress report. Everything works with the enhance peanut butter design, and there is no interruption of the feedback under heavy braking.

The feedback is quite a bit stronger than I expected. Have to turn down the signal so it's not uncomfortable. Once the 2nd amp arrives and I get the side-bolster reconnected, I'm quite sure with 4 exciters I'll have to turn down the amps quite a bit. Anyway, what I thought would be 'too weak', has turned out to be much, much stronger. Which is good because it allows lots of room for fine tuning/balancing the different SimHub effects that I may pass to those channels.

Only one small issue now. The large plastic insert that I used (across the entire back piece) has cracked when I was installing it back into the covering. It's just a bit too brittle so I need to find something a bit more flexible, but still relatively solid so that the vibrations pass through. It'll work fine for a while as it is, but eventually I'll have to find a different material and change it out.
 

Latest News

Do you prefer licensed hardware?

  • Yes for me it is vital

  • Yes, but only if it's a manufacturer I like

  • Yes, but only if the price is right

  • No, a generic wheel is fine

  • No, I would be ok with a replica


Results are only viewable after voting.
Back
Top