Tactile Immersion - General Discussion - Hardware & Software

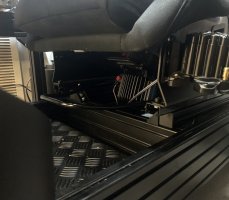
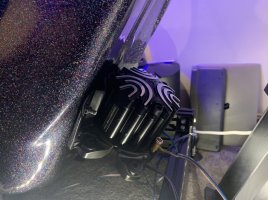
@Mr Latte Does this look compatible with the Race-Bass mounts?
This is just a mockup using 40x80 risers. My rig has 40x120 risers or is 4.7" tall and the foot plate is 20mm or .78" above that.

I think you mentioned that a 3" depth was needed. Does that mean that as long as I added a horizontal surface 3" below the plate at each of the 4 isolator positions that would work? I could easily create these horizontal surfaces with 1/4" thick by 4" Angle aluminum. Trying to think about the future a bit. I'll worry about the seat later, but I think I have some ideas that would be compatible.

Would a t.tracks DSP solution for both my NX4-6000 and a new 304 work? You had suggested that tool for me a while back.

Thanks!

Solution_6794.jpg
 
Last edited:
@Mr Latte Does this look compatible with the Race-Bass mounts?
This is just a mockup using 40x80 risers. My rig has 40x120 risers or is 4.7" tall and the foot plate is 20mm or .78" above that.

I think you mentioned that a 3" depth was needed. Does that mean that as long as I added a horizontal surface 3" below the plate at each of the 4 isolator positions that would work? I could easily create these horizontal surfaces with 1/4" thick by 4" Angle aluminum. Trying to think about the future a bit. I'll worry about the seat later, but I think I have some ideas that would be compatible.

Would a t.tracks DSP solution for both my NX4-6000 and a new 304 work? You had suggested that tool for me a while back.

Thanks!

View attachment 499701

It appears to decouple the entire pedal deck frame/section from the rig which is good.
This seems grand for the units you are installing but be sure to change the phase 180 for the TST as it is inverted, while the BK is upright.

4x 50 durometer Sorbothane I think are good for @18kg so not a great deal but if you can get 70 durometers, I'd go with them.

I have considered a solution for supporting the springs, possibly allowing @2" of vertical adjustment and @3" horizontal positioning at @4" wide. This should accommodate most profile-based rigs using 80mm and up. Yes springs are approx 3" but they don't have to be, as additional isolation pads can also be added to them for people that want or need additional vibrational dampening.

The plate idea I have would accommodate up to dual BK and dual TST for the pedals. Not necessarily for stereo, but to enable more effects to be used yet maintain the energy/quality this type of combo brings. It may seem extreme but trust me, it can offer additional advantages to the immersion as well as 2x the output/energy for specific effects scenarios as Stage 1 offers.

I don't think you are going to be considering these as a potential later option but it is what I want the official product/solution to offer support for.


t.racks DSP is affordable considering it supports both 4x inputs/outputs.
So one for dual BK/TST and another for Exciters could work.

You can try out its software with a free demo mode to see what it offers
See bottom of the page here for downloads.

It offers 12/18/24 dB per octave filtering with popular filters (Butterworth / Bessel / Linkwitz-Riley ) You can then position EQ filters with Q control within the curve applied. Play about with the software to get an idea.

Screaminbejesus with VR3 used a design idea I gave him for his plates to install his BK etc.
It helped lower the deck level to the main "H" frame. He used BK 200 isolators which are quite stiff and are 2" so the spring solution I am working on should work with a VR3 and be possible to install as only 1" taller (before compression).

I have one guy that I mentioned earlier in the UK that wants to add them to his rig who could be a good test candidate not far away. Need to hear back from him but I do not see any additional tilt issues with the VR3....
 
Last edited:
Thanks again!

That's very interesting about the phase. I would have assumed that hanging down would be right side up for them since it is their typically mounting arrangement. I haven't found anything in their documentation that indicates this. However I'm certain that by now you have plenty of empirical evidence about that.

Ordered the 70 durometer rings and will have them by next weekend.

Looks like the t.racks all come from the UK. I'll order a pair of them when I get my exciters and 304. Looks like someone already asked about the t.rack 4x4 mini amplifier with DSP and their 4x 60W's didn't hold up well?

Actually, I'd need to recheck how / I actually have mine lol, sorry just in from work.
The BK can be placed upright or upside down so best to compare with it the phase each way and maybe not the TST.

The TST are typically installed label facing down, at the moment on my rig with some testing, I have both my BK/TST units upright causing confusion...

Most exciters users have gone with the EPQ 304, we wont use much of its wattage but seems a well enough built amp for the money with 4 channels and independent volume dials. In fairness I have not heard of anyone having issues with this amp but yeah change the fans for sure.
 
Last edited:
Team,

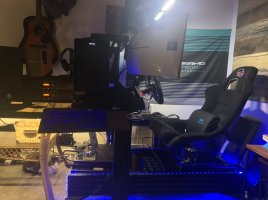
this thread is amazing for sure but also very complicated to get into. I don’t think I fall into the lazy category but I am very visual and a hands on learner. To that point I have decided to forgo motion at the moment and focus on tactile. In addition, due to this thread I am going to avoid buying four mini-lfe and attaching them to the four corners of my rig, pictures below. So here is the question just to make sure I am digesting this all correct.

-I want to start slow and learn but I also don’t want to waste a ton of money later because I bought something that can’t be upgraded.
- my rig is pictured below and is px-1.
- my rig is setup on a concrete floor so I don’t have to worry with making noise.
- budget for this step of the project is about $800USD
- I’m thinking an NX-1000D with a buttkicker LFE.
- I would mount this under the seat. I did have a question on this. if I use MFD board can I place it underneath the cross rails or should it go on top of the sliding seat rail?
-if This all goes well I will add another lfe and place it under the pedals
- long term I will add a nx3000d and some of the TST’s you all recommend.
-Simhub will be my software
-I’ll grab some external sound card for $40 to make this all work.

Does this all sound like I am in the ballpark before I pull the trigger?


E4A74DBB-4BE1-40D9-810B-6645AD8CCBD2.jpeg


DCC44681-7E13-4458-9754-425BCCC07E58.jpeg
 
With that budget I’d definitely recommend the 1000D and a BK Concert. Concert will allow you to get more power out of the amp, being 2ohms (500w x 2 @ 2ohms, 300w x 2 @ 4ohms). Under the seat will be perfect and the board shouldn’t matter too much as long as your isolation (some rubber or sorbathane pads should suffice if you’re not willing to go whole hog) is underneath the board. So seat > rails > board > isolation > chassis. That’s how mine is.

I’m sure there will be very in depth and complicated advice given, which is more than fine if you want to go down the rabbit hole. But starting with some simple, easy to implement isolation combined with the hardware mentioned will give you a really good feel. You can use that amp to add another BK later or do what I did and grab a TST and run one of each.
 
Team,

this thread is amazing for sure but also very complicated to get into. I don’t think I fall into the lazy category but I am very visual and a hands on learner. To that point I have decided to forgo motion at the moment and focus on tactile. In addition, due to this thread I am going to avoid buying four mini-lfe and attaching them to the four corners of my rig, pictures below. So here is the question just to make sure I am digesting this all correct.

-I want to start slow and learn but I also don’t want to waste a ton of money later because I bought something that can’t be upgraded.
- my rig is pictured below and is px-1.
- my rig is setup on a concrete floor so I don’t have to worry with making noise.
- budget for this step of the project is about $800USD
- I’m thinking an NX-1000D with a buttkicker LFE.
- I would mount this under the seat. I did have a question on this. if I use MFD board can I place it underneath the cross rails or should it go on top of the sliding seat rail?
-if This all goes well I will add another lfe and place it under the pedals
- long term I will add a nx3000d and some of the TST’s you all recommend.
-Simhub will be my software
-I’ll grab some external sound card for $40 to make this all work.

Does this all sound like I am in the ballpark before I pull the trigger?


View attachment 499782

View attachment 499783

pretty decent rig sir ;)
The isolation is not about making as low noise as possible, it´s more about feeling the most all over your body with the less wattage, so you don´t need 3x1000 watts shakers in order to feel the same effect than using 1x1000 watts shaker mounted on a proper isolated rig.
I just made up the figures so you get what I mean. Enjoy the ride :)
 
- Team,
this thread is amazing for sure but also very complicated to get into. I don’t think I fall into the lazy category but I am very visual and a hands on learner. To that point I have decided to forgo motion at the moment and focus on tactile. In addition, due to this thread I am going to avoid buying four mini-lfe and attaching them to the four corners of my rig, pictures below. So here is the question just to make sure I am digesting this all correct.

-I want to start slow and learn but I also don’t want to waste a ton of money later because I bought something that can’t be upgraded.
- my rig is pictured below and is px-1.
- my rig is setup on a concrete floor so I don’t have to worry with making noise.
- budget for this step of the project is about $800USD
- I’m thinking an NX-1000D with a buttkicker LFE.
- I would mount this under the seat. I did have a question on this. if I use MFD board can I place it underneath the cross rails or should it go on top of the sliding seat rail?
-if This all goes well I will add another lfe and place it under the pedals
- long term I will add a nx3000d and some of the TST’s you all recommend.
-Simhub will be my software
-I’ll grab some external sound card for $40 to make this all work.

Does this all sound like I am in the ballpark before I pull the trigger?


View attachment 499782

View attachment 499783
I have the same rig and seat. Don’t do the MDF board, it will neuter your tactile feedback. I’ve done it.

Get the NX3000D and a BK LFE; attach directly to seat.
 

Attachments

  • 0CD3FD71-2A11-45F5-987A-3A399048729D.jpeg
    0CD3FD71-2A11-45F5-987A-3A399048729D.jpeg
    321.5 KB · Views: 156
  • E9C83E12-CF4A-4800-81D9-3D83C732F880.jpeg
    E9C83E12-CF4A-4800-81D9-3D83C732F880.jpeg
    285.5 KB · Views: 140
Last edited:
For ease I like attaching to the seat. But isn’t there a complaint that you have to turn the watts down to not feel like you are getting rammed in the rear? Order placed now it’s just a debate about how to mount. I guess I will understand this after I try both ways
 
For ease I like attaching to the seat. But isn’t there a complaint that you have to turn the watts down to not feel like you are getting rammed in the rear? Order placed now it’s just a debate about how to mount. I guess I will understand this after I try both ways
LOL! Yes, if it's turned up a bit too high it feels exactly like your ass is being pounded by a piston at low frequencies.
 
  • Deleted member 197115

From my personal experience attaching transducers to cantilever plates greatly improves feedback quality, making it into more in a car like experience when things get softened through suspension versus harsh jack hammer like knocks and buzz.
sim-lab sells some or you can make your own from aluminum plates.
 
Last edited by a moderator:
From my personal experience attaching transducers to cantilever plates greatly improves feedback quality, making it into more in a car like experience when things get softened through suspension versus harsh jack hammer like knocks and buzz.
sim-lab sells some or you can make your own from aluminum plates.
SimLabs just has the mini-LFE ones.. I have 4 unused ones. I have the plates for advances too.. not sure where to get one for the LFE though
 

Attachments

  • EB5C03C6-0F51-4AED-88A5-166F36BFA02F.jpeg
    EB5C03C6-0F51-4AED-88A5-166F36BFA02F.jpeg
    305.4 KB · Views: 69
I have the same rig and seat. Don’t do the MDF board, it will neuter your tactile feedback. I’ve done it.

Get the NX3000D and a BK LFE; attach directly to seat.

Perhaps, something to consider, the main body of the shaker doesn't touch the surface.
Its supporting legs do so all the energy transfer is going into the seat. Whats not so important is the size of the contact area of the feet but that they are short and not that far apart...

We can, increase the contact area so it is wider/longer, for vibes going into the seat underneath to offer a better spread of its energy over the seat. Less so much a narrower impact region.

This is to avoid a small/direct hotspot to one point of the seat. Having a metal plate drilled to attach the BK, then use some risers to then bolt through the plate and the risers into the seat is a tried/used solution by people.

The BK Concert Plate
as an example can work well for this role.
Its X shape and slots let you align/drill holes into the seat, then the energy can go into the seat via the 4 bolts and any risers you may use to increase the surface contact.

Keep in mind these are used on drum thrones, but the concept is the same, getting the energy of the unit into a seat. You could use nice thick, load spreading washers to have in between the plate and the seat at the 4 mounting points. This will also then let the plate act as a mechanical lever (torque multiplier) for the BK. Use some rubber and then metal washers on the inside of the seat for the nuts.

Doing something like this and there are various ways to do it, will improve over direct mounting to seat.

@verysorry can I also ask, did you try to compare the BK Advance on the side with one placed more at the back of the seat/support than more at the front. I mention this as one time I had a test build with 4x Large BK directly mounted to the seat in 2 front 2 rear configuration. For me on my seat, the units at the rear felt better as more of their energy also went in the back of the seat.

Id be interested to have you try this out
 
Last edited:
I thought some of you might appreciate these.

I've updated my 8 Pole Neutrik receiver mount to handle 2 x 8 Pole receivers to handle up to 8 transducers.
I also updated the 2/4 Pole receiver mount to be more friendly.


4PoleMount.jpg
NeutrikDual8PoleMount.jpg
 
@verysorry can I also ask, did you try to compare the BK Advance on the side with one placed more at the back of the seat/support than more at the front. I mention this as one time I had a test build with 4x Large BK directly mounted to the seat in 2 front 2 rear configuration. For me on my seat, the units at the rear felt better as more of their energy also went in the back of the seat.

Id be interested to have you try this out
Hey Mr. Latte, I did have the Advances on the rear of the rig and as you said, it felt much better. The ones I have directly mounted to the side, I don't actually really feel in the seat, I actually feel them more on the heel plate. The BK Advance that I have on the heel plate, I feel more on the seat... and I can tell which side the vibrations are coming from. It's inverted to what I was expecting to happen. (edit: maybe I misunderstood, do you mean add the BKs to the rear bucket mount? If so, no I haven't tried that and will. That looks like a much more suitable location)

I haven't moved the Advances back to the rear yet because I'm still trying to figure out what to do with them. I have the TST coming in, in the next couple days and I'm going to attach it to the seat, which is when the Advances come off. I feel like I'm just trying to force the advances into the setup simply because I have them, and not that they add anything the LFE doesn't already deliver better. I thought initially that I could use the advances for chassis type mode, but it really leaves a lot to be desired with my rig.

I'm going to get a steel plate and some risers as you recommended and attach that to the seat and see how it goes! Thank you!
 
Last edited:
Oh man, I was ready to order some Dayton exciters from Parts Express, last night they had expected back in stock of 9/3, this morning expected date is 11/19 :(
Just ordered a bunch of hardware with the expectation of them being available soon.... :(

Edit: Then again I may have got my order in early enough to reserve a 9/3 order that is all spoken for....

I can hope, right?
 
Last edited:
@ Mr. Latte
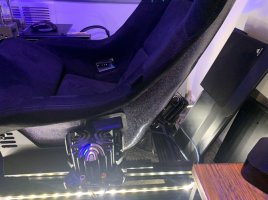
Moved the advance to the rear mounting bracket.. it was a bit better. Still a lot of problems with the energy going everywhere else though since it’s not isolated.

Decided to attach an advance directly to the seat itself and it’s so much better. Does a better job than the LFE right now at some of the higher hz, specifically the 63/35hz in your RPM profile (and above.) So at least they are good for something now!

The TST is coming tomorrow so ill hook that up hopefully too.
 

Attachments

  • 03849C85-B866-4941-930B-FDF67AFFAC4E.jpeg
    03849C85-B866-4941-930B-FDF67AFFAC4E.jpeg
    288.8 KB · Views: 108
  • DE52BA4B-3517-4E01-8FB5-E9576958C57A.jpeg
    DE52BA4B-3517-4E01-8FB5-E9576958C57A.jpeg
    212.8 KB · Views: 107
Last edited:
  • Deleted member 1449502

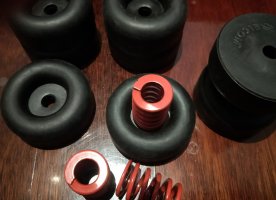
Well they arrived quicker than expected
 

Attachments

  • IMG_20210902_110854.jpg
    IMG_20210902_110854.jpg
    509.2 KB · Views: 126
  • IMG_20210902_110909.jpg
    IMG_20210902_110909.jpg
    668.7 KB · Views: 124
Nice, you could think about putting a washer on the inside to protect the rubber but I dont think it's necessary.
You will find when done up that adjusting the bolt and how much preload you put on the springs will effect how they work. So you may want to try them looser, then more and see what happens.

I used some drill bits as spacers to play around, for instance doing them up tight enough for a 12mm drill bit to just fit between the rubber, then try it with 13mm, etc. You may just set it and forget it if it feels good but worth at lesat seeing what they are like with little tension and then do them up more. Try to make sure that the bolt going through the bottom one doesnt make contact with what you mount it to or you end up with a hard contact point bypassing the isolation.

I found it hard to say that there is no flex with this, there is if you brake hard. You could minimise this by doing them up a lot more and that may work for the big lfe but it wasnt so effective for the smaller ones. I dont notice the flex when driving, you are still applying same forces to pedals so muscle memory is the same. Worst case is because some energy goes in to the isolators you have to recalibrate.
 
Last edited:

Latest News

Do you prefer licensed hardware?

  • Yes for me it is vital

  • Yes, but only if it's a manufacturer I like

  • Yes, but only if the price is right

  • No, a generic wheel is fine

  • No, I would be ok with a replica


Results are only viewable after voting.
Back
Top