Tactile Immersion - General Discussion - Hardware & Software

Places to improve:
The supplied bolts for mounting the transducers to the brackets were actually a
little too short. I could not get them to thread more than 2 or 3 turns with the lock
washer installed without bottoming out the foam pad under the transducers.
I already let the vendor know those bolts were too short and he said he would increase by a few mm on the next batch. As you said, the customer service is excellent.
 
Last edited:
@DaveOM

Good that you are getting some enjoyment from tactile, here are some points I see but do believe you can improve the immersion you are getting. Are you interested in that, well you should be, right?

Tactile Basics:
If we trace where the primary energy from the transducers which are mounted on the brackets that connect to the isolators can flow. Then we can be certain that the first point of travel/flow the vibrations have are...

1) Into the isolation springs and to the floor
2) Along the main lengths of the frame of the rig
3) Across the horizontal connections of the rig's frame connected to the main lengths

Yes, their energy will also go up into the seat/pedal sections but the approach of this concept is flawed/counter-productive based on 1,2,3 above. It places units in representative positions for wheels/suspension bringing limited/questionable benefits, over and above any priority in achieving better efficiency and performance for felt effects being generated.

As an approach, it also does nothing to go beyond the "performance limitations" of what is a fairly average budget model, yet $750 is quite a lot of money. While I know the springs/isolation performs quite well. Just my views, but, too much of the budget for this concept is within the springs/isolation.

I dont get it, isolation is usually about reducing the vibrations going into the floor or helping maintain the tactile energy within the isolated object. In this case the whole rig. So placing the transducer on top of the isolation, makes it easier for its primary energy/detail in its output go through the isolator into the floor.

As disclosed and proven by several others that have had 4-way installations in the past. Improvements are possible from more direct, closer proximity installations of transducers that also offers less mass/weight which we achieve by applying isolated pedal/seat sections instead.

The additional "bobbins" you are using for seat isolation are quite basic. They have about 1/2 inch of neoprene rubber in between the two (male/female) threads. In your images, it appears the rubber isolator is not in proper contact with the frame of your rig, as the bolt seems to have them raised.


Conflict:
The two rear transducer units generated vibrations for your seat, now have to go through/past these additional "isolation bobbins" you have installed.

It appears that you are trying to isolate the seat from the rig for Earthquake Q1 to help maintain its vibrations within the seat. You are then reducing/limiting the vibrations from your rear corner units going into the seat.

Achieve more detail and better resulting tactile with lower amp output if you do the following:

1) Seek to make/buy better isolators for the seat but consider giving these a stable/full contact support beneath, not just hanging over or balanced on a 45mm profile edge. Perhaps use corner brackets each side to offer a wider support for the 64mm dia:

Possibilities =
Clark Ti 200 120kg model (quite firm)

Clark Ti 100 / Penn Elcom 64mm dia
As documented on these forums by myself in the past, insert a bobbin like the ones you have between top/bottom 64mm isolators for an improved and affordable solution.

Example:

You can add, neoprene and metal washers on the inside to help increase the height to help with the internal bobbins compression. You can have the bobbin replicate the role of a spring.


An alternative is to consider different lengths/thicknesses of springs instead of the bobbin that fit but these are more expensive.

2. More direct installation to seat/pedals:
What you or others, seriously need to consider is having the transducers at the rear connected to some form of plate that connects directly to the sides of the seat frame or seat risers.

This way you have the BEST of the transducer's detail/energy going DIRECTLY into the seat as the PRIMARY contact surface/object. This combined with your current spring/isolation will still act as (secondary isolation) from vibes going into the floor.

I hope some of you will try this and report back but also, still nobody has shown or said anything about the effects that come with this $750 option.
 
Last edited:
  • Deleted member 197115

- What is the reason for sandwiching, better isolation, less flex, both?
- How suitable is sandwiched rubber isolator for seat mount application when using stiff brake pedals?
- How rigid is it, is there much less lateral flex than with bobbin alone?
- Any videos of this setup in action with heavy braking in progress will be highly appreciated.
 
Nobody has shown or said anything about the effects that come with this $750 option.
The 4-corner package is only ~$550, to be clear. I added an MQB-1 myself.

The vendor simply suggests a basic Simhub profile here. I took that, several YouTube videos, and many suggestions from this thread, and just built my own. As you have noted many times, it's impossible to predict how any profile will respond to any rig. The slip-angle package is designed for an 8020 rig, but that's about it.

Here's where I landed, FWIW.

Gear shift: 25Hz / 50ms
Road Rumble: 25-35Hz +- 2Hz, gamma 0.5
Road Vibration: 40-50Hz +- 2Hz, gamma 0.4
Wheel slip: 50-70Hz +- 2Hz, gamma 0.3

I am running nice lumpy Idle RPMs (13Hz+-3Hz) in an RPM layer up to ~3000 RPM, and this sits on top of the Engine LFE signal coming from iRacing. As this Simhub layer fades out in the pit lane, I'm just left with the iRacing LFE Engine and Rev Limiter notes in the seat.

I'll add in a layer for the Thruster to hopefully fill in some high-freq revs from ~6500 RPM up. IRL I've had two engines with high-cam changeovers (a Honda B16A VTEC and a Toyota 2ZZ-GE) and I'm going to see if the Thruster can add similar vibes as the redline approaches. It should arrive today.

I'd be interested if you have suggested frequency ranges that tend to work well with the MQB-1 or Thruster. As a low-cost introductory pairing, I would be more than happy to work with anyone on 2-layered profiles to be shared here.

The reason recommendations are given for people to:
1: Apply isolation to seat and pedals
2: Use tried, tested hardware combos
3: Install these as advised

Is actually to make it simpler to enable people to better experience a similar quality of immersion. With this approach, then we reduce greatly the differences between rigs and seats.

Another major benefit is that people can then experience and enjoy more elaborate effects that....

1. Use multiple body regions for increased detection and improved sensations
2. Combine recommended hardware for a much wider dynamic range
3. Go beyond the performance and installations of traditional approaches
4. Are buying into a concept that is by design upgradable
5. Has effects being specifically made for it

With the effects you listed, you are very close to my own predictions that most people with budget tactile, will generally use @30Hz-80Hz (50Hz operational window)

Send me a DM I will maybe look out some past engine effects for you to try on a Q1 and EXC combo. It would be good to get your feedback on how those compare to what you are currently doing.

I have a Q1 also but my rig at the moment is only set up with EXC connected to the seat as this is the configuration I am working on for 8-way multi-channel effects. I just cant get the time or mindset to start working on a new installation I need to do for my own seat.
 
Last edited:
It would be interesting if someone was to take the i-racing LFE output channel to have it also insert into the soundcard (line in) to then record it. I have never looked at it, but do not believe the effects from (i-racing LFE) are that advanced.

So if we had a recording, then it would be possible to show or help people to understand exactly what it is outputting in any combined/generated frequencies.

Nice engines, are not hard to do in Simhub, but because they are very consistent it is best to have these on their own channel. However, with my own approach, being able to have scenarios like (idle/peak) have their outputs extended beyond a channel used mainly for engines also to output over additional channels and body regions, certainly brings extra enjoyment and immersion possibilities.
what is you opinion on iracing lfe output compared with simhub?

All people who use iracing love it and I see often that they want to replicate these effect in simhub.
 
what is you opinion on iracing lfe output compared with simhub?

All people who use iracing love it and I see often that they want to replicate these effect in simhub.

I don't personally use it, as I said, but my understanding is from conversations in the past, that it is limited in what it can offer in comparison to what we can do in Simhub, I doubt it will even come close.

You can show the controls it offers or go into more detail why you use it, or what you have it do?
 
Last edited:
I don't personally use it, as I said, but my understanding is from conversations in the past, that it is limited in what it can offer in comparison to what we can do in Simhub, I doubt it will even come close.

You can show the controls it offers or go into more detail why you use it, or what you have it do?
ok.
No, I don‘t use iRacing. Maybe in future.
 
I'm putting together a BST-1 based kit and looking for mounting solutions. I have an 80/20 rig, ASR 4.

I was originally looking at using the monitor mounts from ASR, but I found these on Amazon for much cheaper: https://www.amazon.ca/gp/aw/d/B07B44VRL2/

I should be able to mount one the transducers to my pedal plate using those with little to no modification. I can't find info about how thick the steel is, I'd guess 2-3mm based on the pictures.

1. Would they be a good solution or would I lose strength/fidelity/etc.?
2. I read somewhere that mounting transducers on an arm or lever (e.g. like certain Buttkickers) helps amplify the effects. Is that true? If so, think these will work like that?

I am planning on finding an O clamp to attach a different VESA mount directly to a bar on the frame of my seat, and isolate the seat from from the rig. If the above plate works well, I could use that + two O clamps. I am having a hard time finding some of the parts others use in Ontario without overpaying or shipping internationally, even the bobbins. Would love to use the above Clark Ti solution.

Unfortunately the design of my pedal plate doesn't allow for isolating it from the rig so I will probably rely on the seat's isolation to keep the two shakers separated. If I decide it needs isolation, I might need to mount my pedals on a separate pedal plate with the transducer and mount the plate with isolation on the rails. Any other ideas? https://www.advancedsimracing.com/products/aluminum-pedal-deck
 
Last edited:
Posting this as another reply to keep the conversation separate.

I live in a small apartment and my number one goal with bass shakers is to avoid disturbing the neighbours, followed by immersion. I've been thinking a lot about isolation. My first idea was to seat the entire rig on blocks of high density reconstituted/rebonded/chip foam, the stuff they use for carpet underlay, but I was having a hard time finding it.

I ended up using a pretty unique way to isolate my rig from the floor.

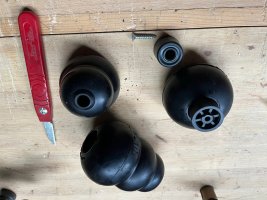
Someone on an iRacing Discord concinced me to use modified Kong dog toys (Kong Extreme Large) as isolators on the floor and linked a thread on the iRacing forums with the instructions. Can't find it now, but the title was something like "mounting your rig on springs". He said they isolate great, feel like sitting on a cloud, and allow the rig to move up/down/laterally and even rotate. They basically give you free 6 DOF wheel-FFB-driven motion.

I was skeptical, but I was convinced by the idea of the increased immersion and how accessible Kongs are to me compared to other isolation solutions I was looking at. I decided to take the risk and walked down the street to the pet store to buy four.

Mounting them was a pain but I got it done. It doesn't tell me much about what the car's doing but it does make it feel more "alive" and definitely helps with immersion. The shakers should take care of the rest. I had a friend try it in VR and he didn't even notice it was moving around until it stopped and killed his immersion. He said it completely took him out of it.

I am concerned about durability and weight but it seems promising so far. The rig itself (ASR 4) is very heavy, and heavier people than me might need more support. I might end up buying two more for more support under the rear of the rig for a total of six.

Will post more about how well they hold up and isolate after I get the transducers set up and inspect the rubber in a few months. Initial tests are alright. If they don't isolate well enough alone then I'm planning on supplementing them with the original rebond foam block idea.
 
Last edited:
@DaveOM

Good that you are getting some enjoyment from tactile, here are some points I see but do believe you can improve the immersion you are getting. Are you interested in that, well you should be, right?

Tactile Basics:
If we trace where the primary energy from the transducers which are mounted on the brackets that connect to the isolators can flow. Then we can be certain that the first point of travel/flow the vibrations have are...

1) Into the isolation springs and to the floor
2) Along the main lengths of the frame of the rig
3) Across the horizontal connections of the rig's frame connected to the main lengths

Yes, their energy will also go up into the seat/pedal sections but the approach of this concept is flawed/counter-productive based on 1,2,3 above. It places units in representative positions for wheels/suspension bringing limited/questionable benefits, over and above any priority in achieving better efficiency and performance for felt effects being generated.

As an approach, it also does nothing to go beyond the "performance limitations" of what is a fairly average budget model, yet $750 is quite a lot of money. While I know the springs/isolation performs quite well. Just my views, but, too much of the budget for this concept is within the springs/isolation.

I dont get it, isolation is usually about reducing the vibrations going into the floor or helping maintain the tactile energy within the isolated object. In this case the whole rig. So placing the transducer on top of the isolation, makes it easier for its primary energy/detail in its output go through the isolator into the floor.

As disclosed and proven by several others that have had 4-way installations in the past. Improvements are possible from more direct, closer proximity installations of transducers that also offers less mass/weight which we achieve by applying isolated pedal/seat sections instead.

The additional "bobbins" you are using for seat isolation are quite basic. They have about 1/2 inch of neoprene rubber in between the two (male/female) threads. In your images, it appears the rubber isolator is not in proper contact with the frame of your rig, as the bolt seems to have them raised.


Conflict:
The two rear transducer units generated vibrations for your seat, now have to go through/past these additional "isolation bobbins" you have installed.

It appears that you are trying to isolate the seat from the rig for Earthquake Q1 to help maintain its vibrations within the seat. You are then reducing/limiting the vibrations from your rear corner units going into the seat.

Achieve more detail and better resulting tactile with lower amp output if you do the following:

1) Seek to make/buy better isolators for the seat but consider giving these a stable/full contact support beneath, not just hanging over or balanced on a 45mm profile edge. Perhaps use corner brackets each side to offer a wider support for the 64mm dia:

Possibilities =
Clark Ti 200 120kg model (quite firm)

Clark Ti 100 / Penn Elcom 64mm dia
As documented on these forums by myself in the past, insert a bobbin like the ones you have between top/bottom 64mm isolators for an improved and affordable solution.

Example:

You can add, neoprene and metal washers on the inside to help increase the height to help with the internal bobbins compression. You can have the bobbin replicate the role of a spring.


An alternative is to consider different lengths/thicknesses of springs instead of the bobbin that fit but these are more expensive.

2. More direct installation to seat/pedals:
What you or others, seriously need to consider is having the transducers at the rear connected to some form of plate that connects directly to the sides of the seat frame or seat risers.

This way you have the BEST of the transducer's detail/energy going DIRECTLY into the seat as the PRIMARY contact surface/object. This combined with your current spring/isolation will still act as (secondary isolation) from vibes going into the floor.

I hope some of you will try this and report back but also, still nobody has shown or said anything about the effects that come with this $750 option.
I'm thinking about doing this for my seat with springs. I'm having a hard time figuring out how to assemble them - would I just use a single bolt through the entire thing, with an assortment of metal/rubber washers?
 
I installed my bass shakers this week and got a chance to test out the isolation offered by the Kongs. They're WAY better than I expected! I'm super happy with how it turned out. I get great isolation with almost no flex on the seat. I forgot to take pics before leaving for the holidays so the pictures I'm using are from the guy who told me to try this.

Here's the inspiration. I took the idea farther and isolated my seat, which was a gigantic improvement over hard mounting it: https://forums.iracing.com/discussion/comment/224757/#Comment_224757

Context​

I live in a narrow, three story townhouse flanked by two neighbours. The rig is on the second floor in an office/bedroom with a wood floor. The room has an adjoining wall with with each neighbour, I believe they both use their rooms as bedrooms. The walls are insulated but I don't think the floor is. When I tried a subwoofer in the room, one of the neighbours immediately knocked on the wall. It's basically a worst case scenario for noise from bass shakers so isolation was critical.

I have two BST-1s mounted on my chair and pedal plate, powered by a cheap Nobsound mini amp. The rig is a heavy duty 8020 rig (ASR 4). I weigh about 140lbs, so the isolators need to support 300-350lbs altogether.

Parts and prep​

I bought four large Kong Extreme toys for $17 CAD each from the pet store, the black ones. They're the perfect kind of rubber and really tough. I cut the Kongs into three sections, small medium and large. They will each support a different amount of weight. I used an old kitchen paring knife to cut them. I also used a bit of cooking oil on the knife, which helped lubricate it against the rubber and that made it a lot easier.

f61af27a-b6ca-47f5-9562-5f987b58e27a.jpega3716493-159f-4826-ae38-73a4b58e9d0e.jpg

I made rubber washers out of the "core" of the top/small dome, but I'd leave them next time and just buy washers separately. It would have made the seat mounting a lot easier because they center the bolts.

I bought an assortment of fender washers and M8 bolts for mounting, which cost $10-$20. The washers need to be very large so there's a wide platform for the isolators to sit on and no chance of them slipping into the rubber.

Floor isolation​

I mounted the large sections onto each corner of the rig to isolate it from the floor. The large sections have fairly big holes so I used a couple of different sizes of fender washers to keep them solidly mounted and centered. The linked iRacing forum post uses correctly sized rubber door stops.

I put the Kongs on top of furniture feet/sliders. The rig still slides around with a bit of effort but I'd definitely prefer casters. I may buy a couple more Kongs to upgrade to six feet, but four seem to support my weight perfectly fine.

Seat isolation​

I initially tried the four middle sections of the Kong to isolate the seat but they weren't providing much isolation for frequencies below 45hz, probably because they were too firm for my weight (less than 200lbs with the seat). They seem to be capable of supporting a ton of weight, maybe more than the large sections. The small sections were perfect, they isolate every frequency well except around 35-40hz.

I bolted the seat to the rig like this, anything I can improve?

Code:
M8 bolt (maybe 50mm?)
Metal fender washer
Rubber isolation washer (cut from the Kongs)
Seat mounting point
Small Kong section
Metal plate/washer
Rig frame w/ T slot nut

I sat in the chair and torqued the bolts down without a ton of preload.

The bolts at the front of the chair pass through metal plates, with the isolators on top. The plates are bolted to the frame at a couple of other points. I did this to anchor it for heavy braking. I was worried about flex, but I am impressed with how solid it is.

Pedal isolation​

The design of my pedal plate won't allow for isolating it from the frame. I'll need to buy a new pedal plate and bolt it with isolation to my existing one. For now, the pedals and front shaker are hard mounted. The front shaker causes the entire rig to vibrate with a lot of sustain, so isolating it is part of the plan.

I was planning on using the small isolators for the pedal plate but I used them for the seat, so I'll need to figure something else out when the time comes. I might need something softer than the small Kong sections.

Results​

The shakers feel significantly stronger and I can easily tell them apart. I am very happy with how it feels now.

I cranked them up all the way, had someone drive around to cause a bunch of noise, and listened for vibrations from directly underneath the rig. The seat shaker (double isolated) was completely silent. I could only hear the pedal shaker quietly. It was quiet enough that my ceiling fan, dishwasher, and furnace were each loud enough to cover it up! I don't think my neighbours can hear a thing, and if I isolate the pedals I might be able to achieve zero noise outside the room.

The seat mounting is very, very solid. There's barely any flex under hard braking, completely imperceptible while driving. I will take a video when I get a chance if there's interest.

Like the iRacing thread states, the whole rig feels like it's sitting on springs or a cloud. This is why I went with Kongs in the first place (along with how accessible they were). Strong FFB from my wheel is enough to cause it to move around freely, allowing it to move up/down/sideways/rotate/etc. This felt excellent for immersion before I added the shakers, and with the shakers it's great! The rig feels alive. I am curious how it compares to solid feet and if it's really adding that much.

I will check to see the condition of the feet after using them for a while and report back. I'm hoping they last forever. I am a bit concerned about weight - the rig's heavy and I've only got the four feet on it. It works fine for me, but what if I have a 300+ lb guest?

I am not an expert at isolation like some of the regulars here, but so far I will totally vouch for Kong.

 
Hello to all, I'm new here. I was just about to buy some cheap transducers after reading and watching youtube videos on them, with everyone claiming even sub 100€ system would work well (increase immersion). Then I found this thread :)

To recap, multiple exciters mounted on a seat seem to be the suggested approach for a budget tactile feedback system. Peter has made a layout for a basic system: https://www.racedepartment.com/threads/rig-report-peter-winkler.202685/page-20#post-3577834. However, this budget system is going to cost over 300€, which is a bit of a stretch personally. If I recall right, there was some discussion on 100-200€ system in this thread, but I couldn't find any practical instructions in the end.

Then some more newbie questions

I'm using a Sparco R100 seat, which is pretty generous with padding and has no hard surfaces like in bucket seats. Will the exciters work when attached to the padding itself (somehow, ideas?). Or do they need a fixed, hard surface to be mounted on?

Do you reckon there to be any heat buildup related issues, if the 40W exciters are installed inside the padding/seat?
 
Does anyone know of a better alternative than the Behringer NX1000D? Worst technical support I have ever seen, cannot talk live to anyone, cannot get any signal out of the A channel from the 3 amps that I bought. Something is not normal... was working fine with the BK amps.

I tried all the modes... like Stereo, bridge, BiModeA, BiModeB, etc... even updated the firmware.

Thoughts?
 

Latest News

Do you prefer licensed hardware?

  • Yes for me it is vital

  • Yes, but only if it's a manufacturer I like

  • Yes, but only if the price is right

  • No, a generic wheel is fine

  • No, I would be ok with a replica


Results are only viewable after voting.
Back
Top