Cars WIP - Honda Life Step Van (First Mod, help appreciated)

I'd really be careful about bunching together too many edges to a single point like this - try and preserve as much as the original surface curvatures as possible (and even on cars like this, almost every surface has some very subtle curvature).
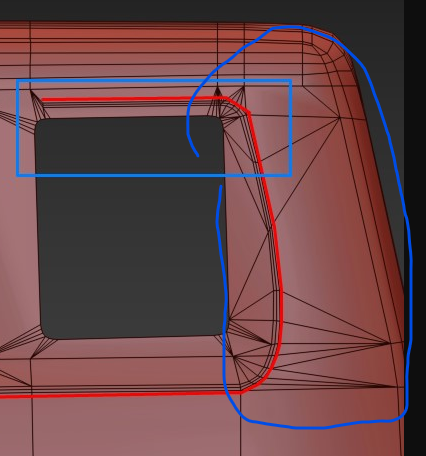
upload_2019-4-25_11-2-7.png


Excuse my horrible hand drawing but something like this will work a bit nicer - also as mentioned earlier I wouldn't bother with those chamfers along the edge until much, much later when you are happy with the mesh shape.
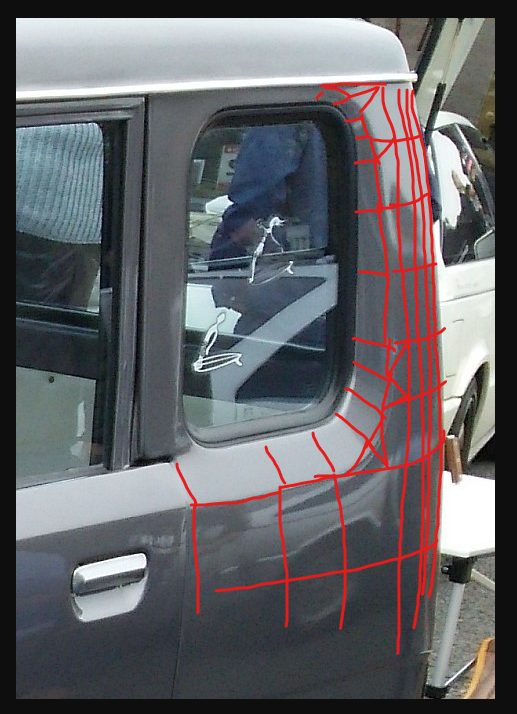
upload_2019-4-25_11-3-0.png


And its exactly the same along the doors etc. You might think being a pretty 'square' car that you wont need any loops but I would add them anyway, as looking at IRL photos there seems to be some very slight curvature (pretty much anything that isn't designed to be modular like a van (long/short wheelbase etc, that kinda thing)) will not have completely flat panels these days.
So yeah, I'd want to add some more loops along the length of the car, you can always remove some later on if they are not needed. But right now its preferable to welding a bunch of vertices from variuus places to one point imo.

Again really terrible drawing. The idea is to try and base the whole car on a nice, consistent poly structure. Later one once all details etc are added you can remove some of the loops if they are not needed, but having them in place early on gives a nice base in which to add said details.
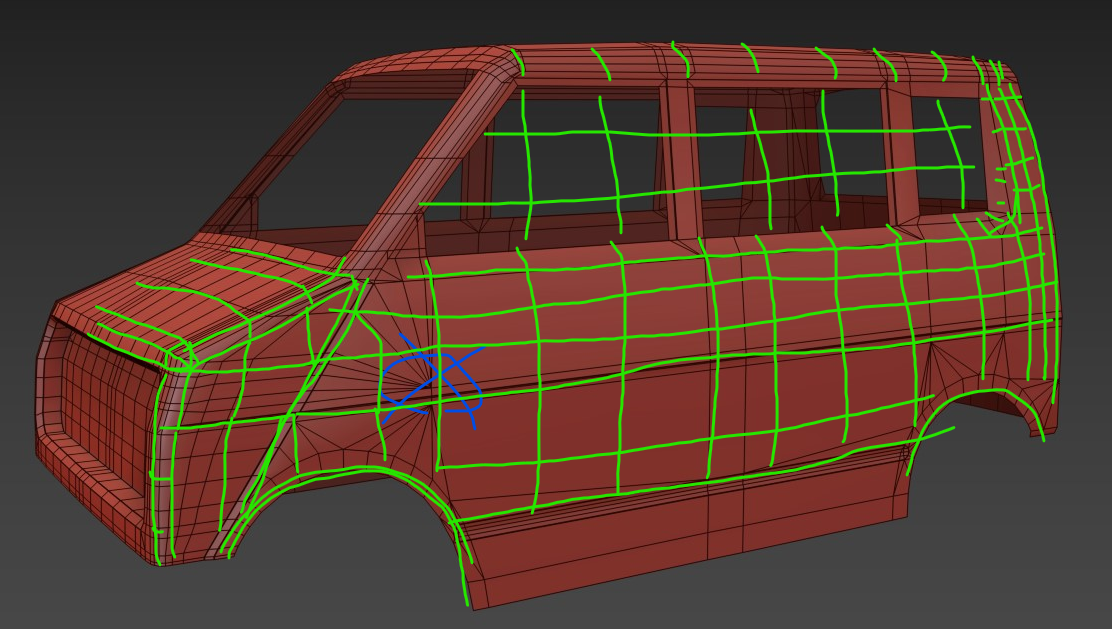
upload_2019-4-25_11-14-19.png
 
I encountered an interesting discrepancy between the KsEditor and ingame reflections. I have been polishing something while looking at the reflections in KsEditor, but as soon as I look at the same thing in game, I come across a different reflection. (Images for reference) Does anyone know how to fix this and what causes this issue?

Screenshot_29.jpg

KsEditor ^

Screenshot_28.jpg

In-game ^

I found the problem, it was just the mapping of the car that was the problem. Just created a quick flattened map and it was gone.

I continued adding details and cleaned up the mesh around the sharp edges on the body. I have a GIF to demonstrate the work I've done yesterday.

Webp.net-gifmaker (1).gif
 
Last edited:
More progress today, things you can see on this GIF and things you can't see on this GIF. I've added details on the rear (doorhandle and numberplate cutout), added the gills on the hood of the car and finally gave the car a proper face with some textured headlights and a grille.

I've also been playing with the shaders for a bit. I guess the next step might be the rims, not the easiest job but probably a good way to learn more about modelling. If anyone has tips and tricks for rims, please let me know!

Webp.net-gifmaker (2).gif
 
the rims are a fun exercice
they are full of symmetry everywhere!
so the idea is to find and model half a pattern, symmetry it, array it, weld the vertices and voila (seems easy right ? xD)

here's a quick find which seems to use that method
(i didn't watch the whole video, so careful about quality), and you also need to apply the game friendly advice you had for the rest of the car ;) don't go full meshsmooth :p
 
I started working on the rims. I have a simple question, yet I'm not sure if it is possible in 3ds max (google did not help me this time). Is it possible to extend polygons along an edge, scaling along the same axis? I added a picture with what I would like to do to make it more clear.

Screenshot_1.jpg


What I currently have:
Screenshot_2.jpg
 
Last edited:
looking good!
you can't directly do it

you can extrude on the depth that border you want to extend, it will create new faces, that you can extrude... creating your extended area
you will need to delete the extruded faces underneath
and on the edges, it's far from perfect, so make sure the vertices will actually touch each other once you do the array...
bit of a workaround!

plan B, is to wait for your rim to be attached together(all the pattern) then you can scale that border all around easily

then plan A" is to extrude the edge using the center as pivot, that could work without having to extrude faces (!)

just found a clean version :p
you can use "pick" and select an object you put in the center, then put that pivot position to custom thingy, and boom !
1574355298727.png
 
Last edited:
looking good!

just found a clean version :p
you can use "pick" and select an object you put in the center, then put that pivot position to custom thingy, and boom !

Thank you so much! This helped me loads and will probably help me loads in future 3d work too. I am happy with the current looks of my rim, it's hard to find clear pictures of the real thing, so this is as close as I can get for now. Any advice on adjustments before collapsing all symmetry are welcome (will keep 1 backup of the rim without symmetry and such applied, just in case).

Screenshot_3.jpg

Screenshot_4.jpg

J60925.jpg
 
The difference that stands out to me is the sections between the squares isn't actually in a plane with them, it meets up a little bit back into the wheel. Also when it gets to the deepest recess of the wheel it's just a single circle, it's not stepping inward for those.
Q3KK2XA.jpg
 
show us the mesh ;)
when you still have the symmetry/array all in instance, is the best time to save some polygons

you could also add the screw area, now is also the good time ^^

Screenshot_5.jpg

Screenshot_6.jpg


The difference that stands out to me is the sections between the squares isn't actually in a plane with them, it meets up a little bit back into the wheel. Also when it gets to the deepest recess of the wheel it's just a single circle, it's not stepping inward for those.

Good find! I will try to adjust the deepest recess. The difference between the "squares" and the sections in between is hard to distinguish in the pictures, I can try to adjust that though.

Result for now, is this better?
Screenshot_7.jpg

Screenshot_8.jpg
 
Last edited:
Back
Top