Hi!
My cockpit is static, I've build a pressure gSeat with bladders and RC servo.
I wanted to increase immersion by a harness tensionner.
I'd already tested a static harness tensionner on a 2 DOF plateform, and the feeling was great.
As my rig is static, I'll have to actuate the harness but the advantage is that I can make a 2 DOF tensionner.
principle:
2 DOF harness -> the strength on the right shoulder and left shoulder will be different
both will react along Surge (longitudinal acceleration)
and Sway (lateral acceleration) will tight one shoulder or the other (depending on left turn or right turn)
(maybe later add some heave information?)
harness : 5 points
the 5th will prevent the harness to move up, this will give actual tension (vs movement)!
prefer larger harness 3" (vs only 2")
actuators:
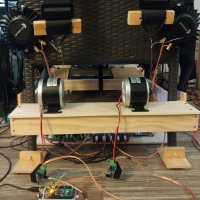
RC servos 35kg.cm (5V to 8,3V)
PSU @7,3V
arduino:
code for 4 servos as I want to combine the harness and the gSeat pressure bladders also RC servo driven.
software:
FlyPT mover https://www.xsimulator.net/community/faq/flypt-mover.29/category


Here is a video showing step by step how I drive the 2 DOF belt with Fly PTmover:
The strength from 35kg.cm servo is enough.
Power up the servo, sit down, thight the belt as you wish, and start the sim. If you tight the belt before powering up the servos, they are loose and they could be pushed out of their range...
The only drawback, in my opinion is the noise of the servos: they are whinning...
here some infos gathered in this FAQ https://www.xsimulator.net/community/faq/harness-tensioner-simulation.361/
► shopping list
"HV high torque servo motor Robot servo 35kg RDS3235 Metal gear Coreless motor digital servo arduino servo for Robotic DIY"

 www.aliexpress.com
17€
I chose 270° range
You'll need a dedicated power supply (5V slower to 7,4V fastest)
Speed: 0.13sec/60 degree at(5v)
0.12sec/60 degree at(6v)
0.11sec/60 degree at(7.4v)
Torque: 29kg.cm.at(5v) -1.9A
32kg.cm.at(6v) -2.1A
35kg.cm.at(7.4v) -2.3A
or stronger but unecessary in my opinion
60kgcm 24€
https://www.aliexpress.com/item/4000055027119.html
speed is voltage related
torque is current related!
1/ choose speed AKA voltage
2/ check the spec which gives you the current at chosen voltage
3/ buy your PSU ;-)
if you choose 7,4V PSU, verify it'll be able to deliver up to 2.3A in order to give full torque (add a BIG margin ;-) )
https://fr.aliexpress.com/item/32823922664.html
11€ 7V 10A
here is my ball bearing support (12€ for 2 supports)
they are made of:
P000 https://www.aliexpress.com/item/32833812473.html
Zinc Alloy Diameter Bore Ball Bearing Pillow Block Mounted Support
they allow a big static disalignment as the bearing is mounted like a joint articulation
and 200mm Ø10 linear shaft Cylinder Chrome Plated Liner Rods
https://www.aliexpress.com/item/4001294745058.html


► budget:
2x 17€ for 35 kg.cm servo
11€ for 7V 10A PSU
(maybe consider a 12V 10A PSU + an Adjustable Power Module Constant Current 5A)
12€ for bearing rollers
15€ any arduino with a USB port (an original to support the community or a clone)
50€ for a used 3" width 5 points harness
total = 120€ all included
arduino code (for up to 4 servos)
here is the setup:

and the file itself: replace .txt extension by .Mover extension
My cockpit is static, I've build a pressure gSeat with bladders and RC servo.
I wanted to increase immersion by a harness tensionner.
I'd already tested a static harness tensionner on a 2 DOF plateform, and the feeling was great.
As my rig is static, I'll have to actuate the harness but the advantage is that I can make a 2 DOF tensionner.
principle:
2 DOF harness -> the strength on the right shoulder and left shoulder will be different
both will react along Surge (longitudinal acceleration)
and Sway (lateral acceleration) will tight one shoulder or the other (depending on left turn or right turn)
(maybe later add some heave information?)
harness : 5 points
the 5th will prevent the harness to move up, this will give actual tension (vs movement)!
prefer larger harness 3" (vs only 2")
actuators:
RC servos 35kg.cm (5V to 8,3V)
PSU @7,3V
arduino:
code for 4 servos as I want to combine the harness and the gSeat pressure bladders also RC servo driven.
software:
FlyPT mover https://www.xsimulator.net/community/faq/flypt-mover.29/category
Here is a video showing step by step how I drive the 2 DOF belt with Fly PTmover:
The strength from 35kg.cm servo is enough.
Power up the servo, sit down, thight the belt as you wish, and start the sim. If you tight the belt before powering up the servos, they are loose and they could be pushed out of their range...
The only drawback, in my opinion is the noise of the servos: they are whinning...
here some infos gathered in this FAQ https://www.xsimulator.net/community/faq/harness-tensioner-simulation.361/
► shopping list
"HV high torque servo motor Robot servo 35kg RDS3235 Metal gear Coreless motor digital servo arduino servo for Robotic DIY"

1X HV hohe drehmoment servo motor Roboter servo 35kg RDS3235 Metall getriebe Kernlosen motor digital servo arduino servo für robotic DIY - AliExpress 26
Smarter Shopping, Better Living! Aliexpress.com
I chose 270° range
You'll need a dedicated power supply (5V slower to 7,4V fastest)
Speed: 0.13sec/60 degree at(5v)
0.12sec/60 degree at(6v)
0.11sec/60 degree at(7.4v)
Torque: 29kg.cm.at(5v) -1.9A
32kg.cm.at(6v) -2.1A
35kg.cm.at(7.4v) -2.3A
or stronger but unecessary in my opinion
60kgcm 24€
https://www.aliexpress.com/item/4000055027119.html
speed is voltage related
torque is current related!
1/ choose speed AKA voltage
2/ check the spec which gives you the current at chosen voltage
3/ buy your PSU ;-)
if you choose 7,4V PSU, verify it'll be able to deliver up to 2.3A in order to give full torque (add a BIG margin ;-) )
https://fr.aliexpress.com/item/32823922664.html
11€ 7V 10A
here is my ball bearing support (12€ for 2 supports)
they are made of:
P000 https://www.aliexpress.com/item/32833812473.html
Zinc Alloy Diameter Bore Ball Bearing Pillow Block Mounted Support
they allow a big static disalignment as the bearing is mounted like a joint articulation
and 200mm Ø10 linear shaft Cylinder Chrome Plated Liner Rods
https://www.aliexpress.com/item/4001294745058.html
► budget:
2x 17€ for 35 kg.cm servo
11€ for 7V 10A PSU
(maybe consider a 12V 10A PSU + an Adjustable Power Module Constant Current 5A)
12€ for bearing rollers
15€ any arduino with a USB port (an original to support the community or a clone)
50€ for a used 3" width 5 points harness
total = 120€ all included
arduino code (for up to 4 servos)
C++:
// Multi Direct
// -> 4 servos
// <255><LeftBelt><127><127><RightBelt>
// Rig : Bit output -> 8 bits
// avec inversion
// PT Mover envoie de 0 à 255 par axe

/*Mover = output "Binary" et "10bits"
Arduino = Byte Data[2]
Data[0] = Serial.read();
Data[1] = Serial.read();
result = (Data[0] * 256 + Data[1]);

OU

Mover = output "Binary" et "8bits"
Arduino = Byte Data
Data = Serial.read(); on obtient directement le résultat*/

#include <Servo.h>  // local library "Servo.h" vs library partagée <Servo.h>

const byte nbServos = 4;

// create servo objects to control any servo
Servo myServo[nbServos];
const byte servoPin[nbServos] = {2, 3, 4, 5};  // pins digitales (pas forcément ~pwm)
const byte inversion[nbServos] = {1, 1, 0, 0 }; // paramètre à changer si un servo part le mauvais sens
int OldSerialValue[nbServos] = {0, 0, 0, 0};
int NewSerialValue[nbServos] = {0, 0, 0, 0};

// servo span:
int servoHomeDegres[nbServos] = { 0, 0, 0, 0}; //sera mis à jour avec la mesure de pression initiale
int servoMaxDegres[nbServos] = { 90, 90, 90, 90}; // cuisseG, cuisseD, côtéG, côtéD
int servoPositionTarget[nbServos] = {0, 0, 0, 0};

const byte deadZone = 0;

// =======================================
// Variables for info received from serial
// =======================================
int bufferPrevious = 0;      // To hold previous read fom serial command
int bufferCurrent = 0;       // To hold current read fom serial command
int bufferCount = 0;         // To hold current position in bufferCommand array
// byte bufferCommand[2*nbServos] = {0};  // (*2 if 10 bits) To hold received info from serial
int bufferCommand[4] = {0};  // To hold received info from serial

void setup()
{
  Serial.begin(115200); // opens serial port at specified baud rate

  // attach the Servos to the pins
  for (byte i = 0; i < nbServos; i++) {
    // pinMode(servoPin[i], OUTPUT); // done within the library
    myServo[i].attach(servoPin[i]);  // attaches the servo on servoPin pin
    }
  // move the servos to signal startup
  MoveAllServos255toDegres(125); // mi-course
  delay(1000);
  // send all servos to home
  MoveAllServos255toDegres(0);
}

void loop()
{
  // SerialValues contain the last order received (if there is no newer received, the last is kept)

  if (Serial.available())
  {
    bufferPrevious = bufferCurrent; // Store previous byte
    bufferCurrent = Serial.read(); // Get the new byte
    bufferCommand[bufferCount] = bufferCurrent; // Put the new byte in the array
    bufferCount++; // Change to next position in the array
    if (bufferCurrent == 255) bufferCount = 0; // one 255 is the start of the position info
    if (bufferCount == nbServos) //si 8 bits, nbServos // si 10 bits nbServos*2
      //Having reach buffer count, means we have the new positions and that we can update the aimed position
    {
      for (byte i = 0; i < nbServos; i++) {
        NewSerialValue[i] = bufferCommand[i];
        //NewSerialValue[i]= (bufferCommand[i*2] * 256) + bufferCommand[i*2+1]; // si 10 bits
      }
      bufferCount = 0;
    }
  }
  // Update orders sent to motor driver
  for (byte i = 0; i < nbServos; i++) {
    if (abs(OldSerialValue[i] - NewSerialValue[i]) > deadZone) {
      if (inversion[i] == 1)
      {
        envoiServoConsigne255toDegres(i, (255 - NewSerialValue[i]));
      }
      else
      {
        envoiServoConsigne255toDegres(i, NewSerialValue[i]);
      }
      OldSerialValue[i] = NewSerialValue[i];
    }
  }
}

void envoiServoConsigne255toDegres(byte servoID, int val )
{
  byte targetDegres;
  val = constrain(val, 0, 255); // constrain coupe au dessus et en dessous : écrêtage et pas mise à l'échelle (comme map)
  // sécurité pour éviter les cas où Simtools enverrait du négatif ou au-delà de 255
  targetDegres = map(val, 0, 255, servoHomeDegres[servoID], servoMaxDegres[servoID]);
  //  map(value, fromLow, fromHigh, toLow, toHigh)
  myServo[servoID].write(targetDegres);              // tell servo to go to position in variable : in steps of 1 degree
  // servo.write(angle)  -> angle: the value to write to the servo, from 0 to 180
}

void MoveAllServos255toDegres( int target)
{
  // send all servos to home
  for (byte i = 0; i < nbServos; i++) {
    envoiServoConsigne255toDegres(i, target);
  }
}
here is the setup:
and the file itself: replace .txt extension by .Mover extension
Attachments
Last edited:


