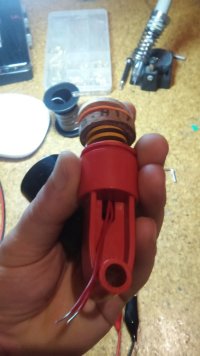
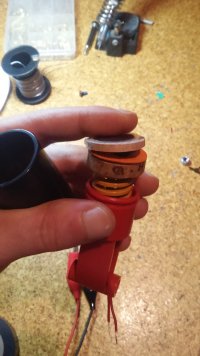
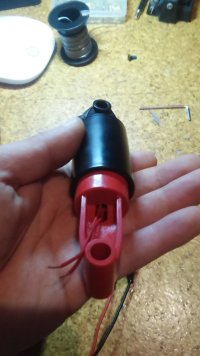
Low budget load cell mod for Logitech G25/G27/G29

Hi,
This mod is something I designed and built based on many things I found on the net.
None was easy enough to make at home with simple tools and common scrap materials.
I went for the cheapest of everything on eBay, but it doesn't mean it's worth less.

I made a few more of these sets for sale if anyone is interested in pre-assembled and tested pieces of handcrafted products. :)
 
With just a single cell, whilst the voltage difference is half that with two cells, you can simply double the amplification and, at least with my foot, I could not tell the difference between the two. I was concerned about noise with the higher amplification, but I could not see any noticeable increasing in the fluttering of the output.

I also think a simple cell is (more than) enough. Noise could have been a concern, thanks for throw it away.
I bough two cells when I bought my G29 (4 month ago), but in my mind one of them was just to be dummy, no load apllied (temperature control). I also guess this concern is unfounded.

Are you happy with the performance? Do you use the full 50Kg of adjust gain to your liking?
 
Upvote 0
Are you happy with the performance? Do you use the full 50Kg of adjust gain to your liking?

I think it's only 25Kg, but personally all can tell is it's firmer than the standard pedal, but not so firm I need to race in footwear, so I can still bumble around the track in my socks :)

I am happy with it, but I think proper racing buffs may want a firmer pedal and would need to consider swapping the rubber block for something less squishy.
 
Upvote 0
Hi,
This mod is something I designed and built based on many things I found on the net.
None was easy enough to make at home with simple tools and common scrap materials.
I went for the cheapest of everything on eBay, but it doesn't mean it's worth less.

I made a few more of these sets for sale if anyone is interested in pre-assembled and tested pieces of handcrafted products. :)
Hi, I live in Germany and would like to buy one also. How can we arrange this?
 
Upvote 0
do you think this would work? of the shelve components and the load cell would fit inside the pedal!
(i posted in another threat as well)

+
 
Upvote 0
Looking at the technical spec it should be fine. Not quite sure what the yellow wire is for in the lower image, but the diagram showing the connections to the wheatstone bridge are exactly what you require with the LB amp
 
Upvote 0
Hello!

Sorry for joining this party 3 years after the last message, but I found this thread on one of those silly Google searches and it got me really curious about this project.

What is the current state of this?

Cheers!
 
Upvote 0
You could also just switch GND and +5V input where you splice the loadcell into the normal pedal loom
this kind of games, at least in PC, invert the signal automatically when you choose the input. Dirt rally for example.
Hello!

Sorry for joining this party 3 years after the last message, but I found this thread on one of those silly Google searches and it got me really curious about this project.

What is the current state of this?

Cheers!
Hello, here is the link https://github.com/GeekyDeaks/g29-load-cell

I did another version but with different load cell (only works on PC, can be modified for use with ps4 but i don't have one for test), and very cheap for less than 4 euros (with all included). And you don't need 3D print or any mod in the g29 pedals parts. You need just a 3cm wooden disc, cork, heat shrinkable, a rigid cable, the 50kg load cell, a new 3cm 40kg spring, and one resistor (or one resistor and one potentiometer if you want a little adjust).

If you want i can share the parts.
 
Last edited:
Upvote 0
Este tipo de juegos, al menos en PC, invierten la señal automáticamente cuando eliges la entrada. Dirt Rally, por ejemplo.

Hola, aquí está el enlace https://github.com/GeekyDeaks/g29-load-cell

Hice otra versión pero con diferente célula de carga (solo funciona en PC, se puede modificar para usar con ps4 pero no tengo una para probar), y muy barata por menos de 4 euros (con todo incluido). Y no necesitas impresión 3D ni ninguna modificación en las piezas de los pedales g29. Necesitas solo un disco de madera de 3cm, corcho, termorretráctil, un cable rígido, la célula de carga de 50kg, un nuevo muelle de 3cm de 40kg y una resistencia (o una resistencia y un potenciómetro si quieres un pequeño ajuste).

Si quieres puedo compartir las partes.
¿Sería tan amable de compartirlo conmigo?
Quiero hacer que la modificación de la celda de carga sea lo más simple y económica posible.
 
Upvote 0
¿Sería tan amable de compartirlo conmigo?
Quiero hacer que la modificación de la celda de carga sea lo más simple y económica posible.
No sé si puedo compartir enlaces de aliexpress en esta pagina, pero te los enviaré por mensaje privado si me los pides. Ha subido de precio lo que usé para hacerlo. SOLO funciona en pc, porque necesitas calibrarlo con Diview. Es bastante duro con el muelle que usé. Quizá encuentres alguno más blando.

Te adjunto el link al mod que hice con sensores hall en acelerador y embrague por si te interesa:

1* El sensor que usé es el de 50kg.
-Sensor de presión de película resistiva, plantilla FSR Flexible, sensible a la fuerza Plantar, 20mm, 20kg, 30kg, 50kg, 100kg, 150kg, 1kg, 5kg, 10kg, 100g
-Plantilla FSR de Robot Flexible, Sensor de presión de película resistiva, sensible a la fuerza Plantar, 1kg, 3kg, 5kg, 10KG, 20KG, 30kg, 50KG, 100KG, 150KG

1724130384639.png


2* El muelle es de 22mm de diámetro y 30mm de largo, tendrás muy poco recorrido de pedal. 1.5cm para ser exactos. puedes ganar un poco, si el corcho que yo metí dentro de la parte negra al fondo (no se ve en las fotos, solo se ve la goma eva naranja) lo pones menos grueso (y usar un muelle "más" largo). También podrías modificar la sujeción de la parte roja con unos orificios nuevos más atrasados... Eso está en tus manos. Yo estoy contento con el recorrido al final uso la presión para frenar!!

1724130326408.png


En las fotos metí los cables por el centro del muelle. Pero deberías modificar eso para que no te dé problemas las soldaduras del cable con la celda. Se me ocurrió que se puede hacer un agujero por arriba en la parte negra y sacar los cables por ahí, así las soldaduras no reciben movimiento.

Las soldaduras recomiendo que las hagas con hielo o algo metálico sujetando las patillas de la celda, porque se puede dañar al soldar. Yo usé hielo la primera vez, y unos alicates planos la segunda vez.

El esquema te lo adjunto aquí mismo. es un divisor de voltaje simple, una resistencia fija + la célula que es un resistor variable con la presión. Si la célula la conectas en R2 (siguiendo el esquema adjuntado) y la resistencia fija 45KOhm(47KOhm) en R1 la salida será invertida. Y si lo haces al revés la salida será no invertida. Funciona de las dos formas, solo debes configurar el juego para que el pedal funcione en el sentido deseado.

Te adjunto fotos, y datos sobre lo que he usado.
El corcho al rededor del muelle es un aro, está alrededor del muelle, no al final. Quita recorrido al muelle al chocar con la parte roja. Aún así se comprime al chocar con lo rojo. evita que el muelle se mueva a los lados, pudiendo dañar las patillas de la célula.

1724128826430.png
 

Attachments

  • 20240613_221703.jpg
    20240613_221703.jpg
    230.6 KB · Views: 13
  • 20240613_221727.jpg
    20240613_221727.jpg
    343.5 KB · Views: 9
  • 20240613_221746.jpg
    20240613_221746.jpg
    290.1 KB · Views: 15
  • 20240613_221750.jpg
    20240613_221750.jpg
    304.4 KB · Views: 14
  • 20240613_221827.jpg
    20240613_221827.jpg
    194.2 KB · Views: 14
  • 20240613_221833.jpg
    20240613_221833.jpg
    233.9 KB · Views: 13
  • 20240613_221900.jpg
    20240613_221900.jpg
    220.4 KB · Views: 13
Last edited:
Upvote 0

What are you racing on?

  • Racing rig

    Votes: 528 35.2%
  • Motion rig

    Votes: 43 2.9%
  • Pull-out-rig

    Votes: 54 3.6%
  • Wheel stand

    Votes: 191 12.7%
  • My desktop

    Votes: 618 41.2%
  • Something else

    Votes: 66 4.4%
Back
Top