Skins Issue exporting transparent car skin to dds

So I've been working on a skin for the Ferrari FXX-K for the past few days (a 4K super accurate version of car #13). It's the first time that I'm working with a transparent skin. I've been working the entire time in Photoshop with CM Showroom open to preview it on the side. This is the result in skin editing mode :
In Skin editing mode (What it should look like).jpg

The issue arrived when I tried to save the skin as a .dds file. When I export the skin with the NVIDIA Tool, there seems to be an issue with the alpha channel not being exported properly or something arround those line. Here's the result:
When saved.jpg

I've tried to change the settings in the NVIDIA Pannel, add my own alpha channel, but I still end up with the same result. Here are my settings for the NVIDIA Pannel :
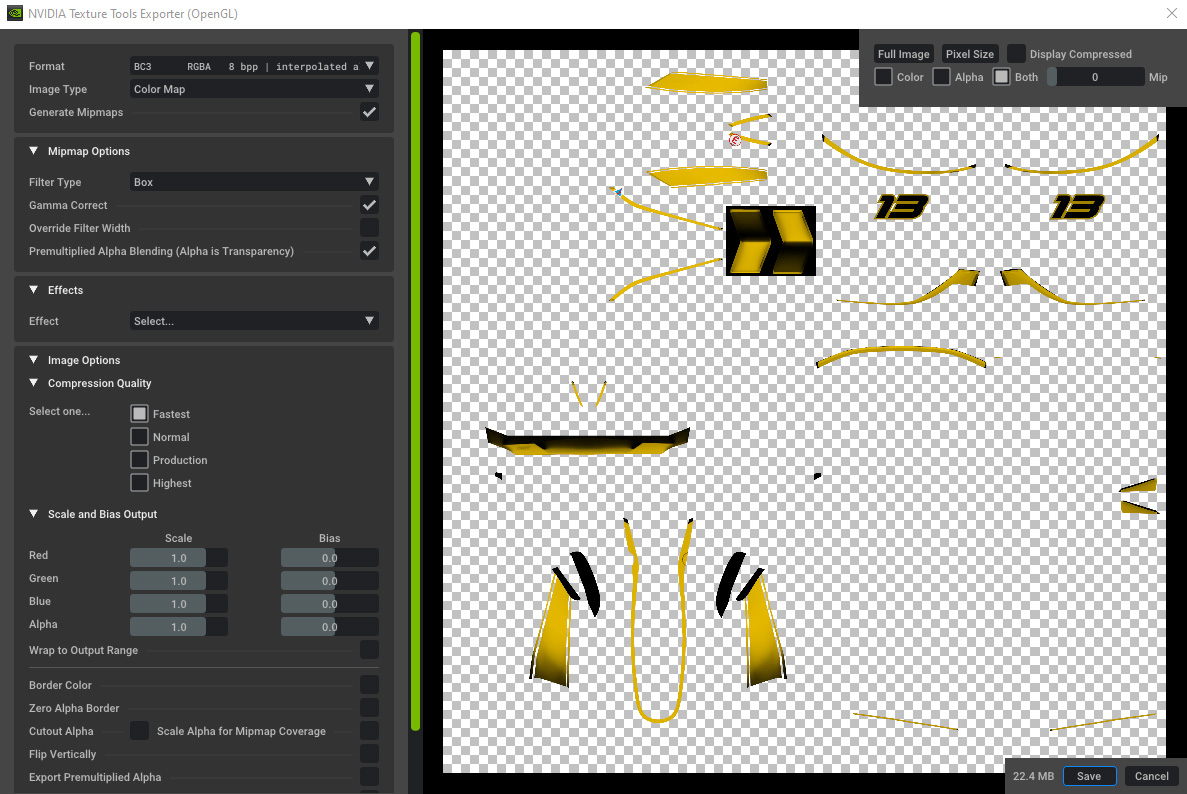
Nvidia Texture Settings.jpg

I'm out of ideas as to what it could be. Does anyone knows how to fix this?
 
'premultiplied alpha' is probably something you want to avoid for AC. I haven't used that tool though so I can't say for certain.
 
Last edited:
AO layer is missing.
What does your alpha look like? It should be white for the yellow stripes and numbers, otherwise black.
Does the alpha actually get exported at all? As in, when you open the .dds, does it have your alpha or all white?
With my ancient Photoshop version, I need to flatten the image before exporting or alpha won't be exported.
Exactly what I was about to write! I've just figured it out right before you posted your comment. Thanks!
 
So if someone gets the same issue in the future, here's a step-by-step guide:
  1. When you're finished making your skin, create a copy of your project so that if you want to change things in the future you'll have a backup
  2. Merge all layers in a way that conserves the transparency (so don't use "Flatten Image")
  3. While holding Ctrl, click on the layer thumbnail of your skin. Then go to the "Channel" window and click on "Save selection as channel" (it's at the bottom of the window and looks like a rectangle with a circle inside) to create the Alpha channel
  4. Put the AO map as the background layer
  5. When you're done, flatten the image and export it. Be sure to use a format that supports alpha channels (I use BC3 RGBA 8bpp | interpolated alpha, which is also known as DXT4/DXT5)
If you use the newer version of the NVIDIA Texture Tools Exporter, you should be able to see a preview of each channel and it's a good way to ensure that you've done everything correctly.
  • If you tick the "Color" box, you should see both the AO map and your skin
  • If you tick the "Alpha" box, you should see everything in black except for your skin which will be filled in white
  • If you tick the "Both" box, you should only see your skin on a transparent background
 
Last edited:

Latest News

Shifting method

  • I use whatever the car has in real life*

  • I always use paddleshift

  • I always use sequential

  • I always use H-shifter

  • Something else, please explain


Results are only viewable after voting.
Back
Top