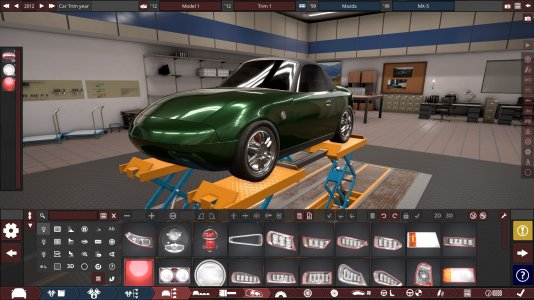
We are back trying to re-create my Mazda MX-5 in the car building simulation title Automation. The 1.6L engine is ready to go from the first article, but the body and the entire underside of the car needs tackling next!
There is no doubt this is one of the hardest challenges I have set for myself. There is no preset that resembles my car at all, so I have had to adjust a preset that is vaguely based on the Mk1 Mazda Miata. For those who do not know, there are very few similarities between the Mk1 and my Mk2, apart from the fact that they use the same engines, the same soft-top roofs, and a scattering of mechanical parts.
This article will be covering the final mechanical additions with those being the suspension, the brakes, the drivetrain and the safety features. The bodyshell and shaping of the car turned out to be a monumental task that took a lot longer than planned, so look out for a third instalment here very soon!


MX-5 Mk1 vs Mk2 . Images: OSX & Elise240SX via WikiMedia Commons CC BY-SA 4.0
My Mk2 MX-5 is made from a mixture of steel and aluminium panels, but for the sake of simplicity, I went with the steel option. The chassis is a monocoque style which has been a commonplace design since the 1920s. The Monocoque is designed to absorb impacts and keep the cabin as safe as possible.
The engine in the MX-5 is mounted longitudinally, meaning that the pistons are in a vertical line when you look at the engine from the front of the car. This also means that the cambelt is at the very front of the engine instead of off to one side. This makes maintenance a lot easier which I certainly appreciated when I changed all of my cooling system parts after the cambelt was changed a month ago.

The final part of the first section is the suspension setup for my Mazda MX-5. For both the Mk1 and Mk2, double wishbone suspensions on both the front and the rear were standard. For my car, I run BC Racing coilovers and every bushing is polybushed front to back. This stiffens up the ride enormously and both of these mods are absolute essentials if you want to go push the limit of your MX-5.
Double Wishbone suspension is independent of the subframe, meaning that the suspension arms move on bushings and ball joints. The shock absorber and coil spring mount to the wishbones to control the vertical movement. You can control the suspension travel, camber angle, caster angle and toe with this very level suspension design.

The gearing setup is very hard to get right, the top registered speed of a Mk2 1.6 MX-5 is 119mph. I set the top gear accordingly and the rest of the sliders are how the software adjusted them to match. Nothing broke or went bang when I hit the test button, so we are going to leave that alone for now.
The differential might be a controversial choice. I still have the original open differential instead of the more expensive limited slip differentials available. I daily drive my car, and whilst I do like sending it sideways when I get a chance, the security of an open diff is enough for me at the current moment.

The car is run on TOYO TR4 Proxes tyres on all four corners. These tyres are the perfect fast road and light track use tyres I could find in my budget. They have been fantastic so far but unfortunately, they are just a bit too big for Automation to let me recreate the correct sizing.
Whilst the photos so far have shown a steel-style wheel, the car is run on post-face-lift alloys or Japan Racing 7's. The Japan Racing wheels have Nangkang semi-slicks on them, however, so I very rarely get to have fun with them thanks to the British weather! The final image of the car does have a set of JR7 replicas I found in the wheel menu to try and get it as close as I could.

The size of the discs represents my setup, as does the type of brake disc. The MX-5 is so easily worked on that a good brake setup is a no-brainer, especially if you plan to add more power. Vented discs dissipate heat much more efficiently and EBC brakes are so well designed that even if I was pushing my car to the limit on track, the tyres and engine temperature would overheat before my brakes got to that point.
The brake pads are a fast road and track compound. EBC Yellowstuff is the top-rated pad that is recommended for road cars before you start to get into the track-oriented compounds. While they produce more brake dust than a HGV at times, they are fantastic. I can stop my car from sixty to zero in just a few seconds.

The safety features are fairly minimal on the car. This is an old Mazda after all, and not an equivalent-age of Volvo. The car does have ABS which has come in useful on more than one occasion in the rain especially. Many people replace the steering wheel but I have got a fantastic Nardi wheel, a post-facelift model that comes with a built-in airbag.
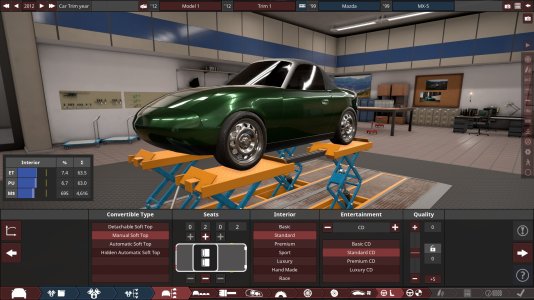
As an extra, I added the infotainment as 'Basic CD' within Automation as my car originally came with a CD reader which was very posh at the time compared to the normal cassette players most of the pre-facelift models came with.

My MX5's interior with BRIDE shift boot and a Mishimoto gearstick. The seats are from a Mk1 MX-5.
That concludes the second part of my MX-5 build series. The reality is that Automation does have its limits, and recreating the body of a Mk2 is proving very difficult. I will do my best to have the final part of this mini-series finished as soon as I can!
In the meantime, let me know what you drive and if you have been able to take it on track within your sim of choice. Feel free to share your Automation projects below as well!
There is no doubt this is one of the hardest challenges I have set for myself. There is no preset that resembles my car at all, so I have had to adjust a preset that is vaguely based on the Mk1 Mazda Miata. For those who do not know, there are very few similarities between the Mk1 and my Mk2, apart from the fact that they use the same engines, the same soft-top roofs, and a scattering of mechanical parts.
This article will be covering the final mechanical additions with those being the suspension, the brakes, the drivetrain and the safety features. The bodyshell and shaping of the car turned out to be a monumental task that took a lot longer than planned, so look out for a third instalment here very soon!
MX-5 Mk1 vs Mk2 . Images: OSX & Elise240SX via WikiMedia Commons CC BY-SA 4.0
Building Process
To begin with, I had to choose a bodyshell to base the car off of. The shell I eventually decided to use is a replica of the Mazda MX-5 Mk1, as I mentioned in the introduction. The car is very small and that becomes a problem later on when we come to fitting the wheels and tyres.My Mk2 MX-5 is made from a mixture of steel and aluminium panels, but for the sake of simplicity, I went with the steel option. The chassis is a monocoque style which has been a commonplace design since the 1920s. The Monocoque is designed to absorb impacts and keep the cabin as safe as possible.
The engine in the MX-5 is mounted longitudinally, meaning that the pistons are in a vertical line when you look at the engine from the front of the car. This also means that the cambelt is at the very front of the engine instead of off to one side. This makes maintenance a lot easier which I certainly appreciated when I changed all of my cooling system parts after the cambelt was changed a month ago.
The final part of the first section is the suspension setup for my Mazda MX-5. For both the Mk1 and Mk2, double wishbone suspensions on both the front and the rear were standard. For my car, I run BC Racing coilovers and every bushing is polybushed front to back. This stiffens up the ride enormously and both of these mods are absolute essentials if you want to go push the limit of your MX-5.
Double Wishbone suspension is independent of the subframe, meaning that the suspension arms move on bushings and ball joints. The shock absorber and coil spring mount to the wishbones to control the vertical movement. You can control the suspension travel, camber angle, caster angle and toe with this very level suspension design.
The Drivetrain
The Mazda MX-5 is famous for being rear-wheel drive and having a manual gearbox. The manual gearbox was exclusively available with five gears in the pre-facelift cars and later had a six-speed option added for the post-2001 facelift versions. However, you can find the occasional automatic MX-5 if you look hard enough... Not that you would ever want to find one.The gearing setup is very hard to get right, the top registered speed of a Mk2 1.6 MX-5 is 119mph. I set the top gear accordingly and the rest of the sliders are how the software adjusted them to match. Nothing broke or went bang when I hit the test button, so we are going to leave that alone for now.
The differential might be a controversial choice. I still have the original open differential instead of the more expensive limited slip differentials available. I daily drive my car, and whilst I do like sending it sideways when I get a chance, the security of an open diff is enough for me at the current moment.
Wheels & Tyres
The wheels and tyres section is where I found my first real barrier for recreating my MX-5 in Automation. The issue I mentioned earlier about the bodyshell being very small is that when I selected my sixteen-inch wheels, they dwarfed the car and made it look rather silly.The car is run on TOYO TR4 Proxes tyres on all four corners. These tyres are the perfect fast road and light track use tyres I could find in my budget. They have been fantastic so far but unfortunately, they are just a bit too big for Automation to let me recreate the correct sizing.
Whilst the photos so far have shown a steel-style wheel, the car is run on post-face-lift alloys or Japan Racing 7's. The Japan Racing wheels have Nangkang semi-slicks on them, however, so I very rarely get to have fun with them thanks to the British weather! The final image of the car does have a set of JR7 replicas I found in the wheel menu to try and get it as close as I could.
Brakes
The brakes on a stock MX5 are nothing particular to write home about. However, I have put a lot of time and effort into my brakes to make sure I have them as I want them, especially if I were to turbocharge the car in the future. My brake setup consists of EBC drilled and grooved discs matched with EBC yellowstuff brake pads on all four corners.The size of the discs represents my setup, as does the type of brake disc. The MX-5 is so easily worked on that a good brake setup is a no-brainer, especially if you plan to add more power. Vented discs dissipate heat much more efficiently and EBC brakes are so well designed that even if I was pushing my car to the limit on track, the tyres and engine temperature would overheat before my brakes got to that point.
The brake pads are a fast road and track compound. EBC Yellowstuff is the top-rated pad that is recommended for road cars before you start to get into the track-oriented compounds. While they produce more brake dust than a HGV at times, they are fantastic. I can stop my car from sixty to zero in just a few seconds.
Steering & Safety
The steering of the MX-5 is a rack-and-pinion system that utilises hydraulics. With such a lightweight sportscar, rapid response steering is necessary, not just desirable. Combine this with the added rigidity of my car's chassis and you can imagine just how fantastic this car is to drive.The safety features are fairly minimal on the car. This is an old Mazda after all, and not an equivalent-age of Volvo. The car does have ABS which has come in useful on more than one occasion in the rain especially. Many people replace the steering wheel but I have got a fantastic Nardi wheel, a post-facelift model that comes with a built-in airbag.
As an extra, I added the infotainment as 'Basic CD' within Automation as my car originally came with a CD reader which was very posh at the time compared to the normal cassette players most of the pre-facelift models came with.
My MX5's interior with BRIDE shift boot and a Mishimoto gearstick. The seats are from a Mk1 MX-5.
That concludes the second part of my MX-5 build series. The reality is that Automation does have its limits, and recreating the body of a Mk2 is proving very difficult. I will do my best to have the final part of this mini-series finished as soon as I can!
In the meantime, let me know what you drive and if you have been able to take it on track within your sim of choice. Feel free to share your Automation projects below as well!